Integrating the best of both worlds, Apple’s Mac computers are known for their sleek design and user-friendly macOS operating system. However, there are times when you might need to access Windows applications or games that are not available on MacOS. Bootcamp comes in handy in such a situation. Bootcamp is your go-to tool if you’ve ever wanted to run Windows on your Mac for those Windows-specific apps or games. It offers a solution to run Windows on your Mac without sacrificing performance or elegance. It’s like having a secret doorway that lets your Mac play nice with Windows.
If you are wondering how you can install Windows 10 on an Apple Mac through Boot Camp, then read this post. In this post, we shall discuss with you some of the best ways to install Windows 10 on an Apple Mac through Bootcamp.
Let’s get started….
Introduction to Boot Camp and Its Purpose
Here is a bried introduction of Bootcamp along with that you will also gain insights on its purposes. Take a look…
What Is Boot Camp?
Bootcamp is a tool specifically designed by Apple in order to help Mac owners to install Windows on their devices. Yes, this tool helps Mac owners enjoy games and apps that are only available for Windows users. As you know that, all Apple devices come with a variety of games and apps that are exclusive to iOS devices. With Bootcamp, you can have the best of both worlds – macOS for your everyday tasks and Windows 10 for those times you need it.
Why Install Windows 10 On A Mac Using Bootcamp?
So, why would you want to install Windows on your trusty Mac? Well, maybe you have a favourite Windows-only game you’re itching to play, or perhaps a work application is only available on Windows. Whatever the reason, Bootcamp lets you get the Windows experience without buying a separate Windows PC. Technically, this tool helps you save a lot of money – you’ll agree to it for sure!
Now, let’s get into the nitty-gritty of how to make this magic happen. We’ll cover everything from checking your Mac’s compatibility to creating a Windows partition and installing Windows 10 step-by-step. By the end of this guide, you’ll be rocking macOS and Windows on your Mac like a tech-savvy wizard. So, grab your Mac, buckle up, and let’s get started on this dual-boot adventure!
System Requirements and Compatibility
Before diving into the world of Boot Camp and Windows 10 on your Mac, it’s essential to check your Mac’s compatibility. Not all Mac models can run Windows through Boot Camp. Yes, you read that right. Therefore, it is crucial to be sure that your device is compatible with it. Apple provides a list of compatible Mac models on their website, so a quick visit there can save you time and hassle. Boot Camp requires a Mac with an Intel processor; here is the list of Mac models compatible with Bootcamp:
- MacBook launched in 2015 through 2017
- MacBook Air launched in 2012 to 2020, excluding MacBook Air (M1, 2020)
- MacBook Pro launched in 2012 to 2020, excluding MacBook Pro (13-inch, M1, 2020)
- Mac mini launched in 2012 to 2018
- iMac launched in 2012 to 2020
- iMac Pro (all models)
- Mac Pro models launched between 2013 and 2019
When it comes to the minimum system requirements for installing Windows 10 through Boot Camp, Apple has some guidelines, which are as follows:
- You need at least 64 GB of free disk space for the Windows partition, though more is recommended for smoother operation.
- Your Mac should have an Intel processor, at least 2 GB of RAM (though 4 GB or more is better), and a USB flash drive with at least 16 GB of storage for the Windows support software.
Ensuring your Mac meets these requirements will set you up for a successful Windows installation through Boot Camp.
Let’s now take a look at the process of installing Bootcamp. Here we go…
Process of Installing Boot Camp
To install Boot Camp on your Mac, follow the steps below:
- STEP 1: Open Spotlight, the magnifying glass icon in the top-right corner of your screen.
- STEP 2: Now, type “Boot Camp Assistant” in the search bar and hit Enter. This summons the Boot Camp Assistant, your guide for adding Windows to your Mac.
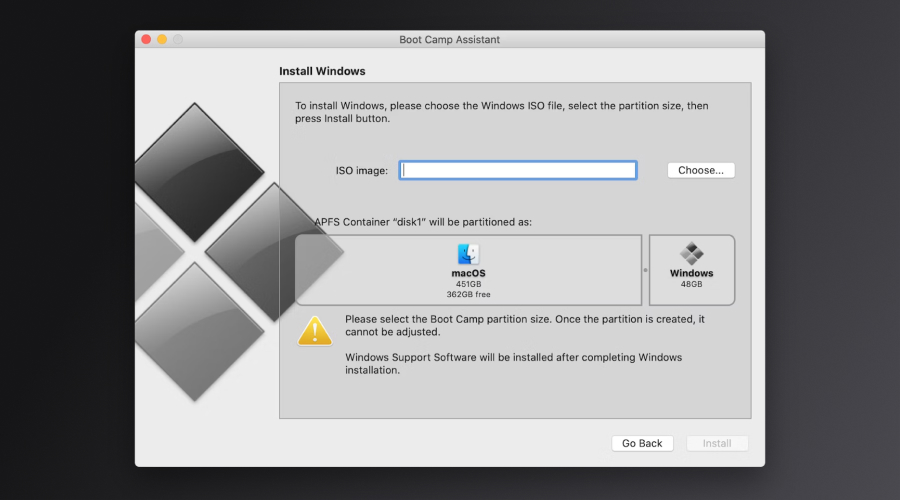
- STEP 3: Once it opens, click through the introduction screen and select “Install Windows” as your task. Decide how much space to give Windows by sliding the bar, considering your needs for Windows apps and files.
- STEP 4: Next, let Boot Camp Assistant format the Windows partition, preparing it for the Windows installation.
If your Mac needs specific drivers to work with Windows, Boot Camp Assistant will download them. Make sure you’re connected to the internet for this step. Then, choose where to save the Windows support software, usually on a USB flash drive or external drive. Click “Save” and start the installation process by clicking “Install.” Your Mac will restart, and the Windows installation will begin. Follow the on-screen instructions, like selecting your language and setting up Windows.
Once Windows is installed, your Mac will restart again. Now, you’ll see a screen asking which operating system to use. You can choose between macOS or Windows whenever you start your Mac. Congratulations! Boot Camp is now set up on your Mac, giving you the flexibility to switch between macOS and Windows whenever you need, allowing you to enjoy the best of both worlds seamlessly.
Step-By-Step Guide To Install Windows 10 On Your Mac Through Bootcamp

Here is the step-by-step guide to install Windows 10 on your Mac through Bootcamp.
STEP 1: Open Bootcamp Assistant
To start, find Boot Camp Assistant on your Mac. You can do this by clicking the magnifying glass in the top-right corner (Spotlight) and typing “Boot Camp Assistant.” Boot Camp Assistant is like your guide for installing Windows. Click it to open the app.
STEP 2: Select “Install Windows”
When Boot Camp Assistant opens, you’ll see some options. Look for “Install Windows” and click on it. This tells Boot Camp Assistant you want to add Windows to your Mac. Click “Continue” to move to the next step.
STEP 3: Choose the Windows ISO File
Boot Camp Assistant will ask you for the Windows 10 ISO file. This file contains all the setup information for Windows. You can download the ISO file from Microsoft’s website if you still need it. Just make sure to save it somewhere you can easily find it.
STEP 4: Create a Windows Partition
Now, Boot Camp Assistant will ask you how much space you want to give to Windows. This is like giving Windows its own room on your Mac. Slide the bar to choose the size of the partition. Make sure to leave enough space for Windows to run smoothly and for your files and apps.
STEP 5: Format the Partition
After choosing the size, Boot Camp Assistant will format the partition. This prepares the space for Windows. Click “Install” to let Boot Camp Assistant do its job.
STEP 6: Download Windows Support Software
Boot Camp Assistant might need to download some extra software for Windows to work well on your Mac. If it asks to download this software, make sure your Mac is connected to the internet. Then, choose where to save these files. A USB drive is a good option.
STEP 7: Install Windows
Now it’s time to install Windows! Click “Install” to start the installation process. The moment your mac will restart, you’ll see the Windows setup screen. Follow the on-screen instructions to set up Windows. This includes choosing your language, region, and other settings.
STEP 8: Complete Windows Installation
Windows will finish installing, and your Mac will restart again. Follow the instructions on the screen to complete the setup of Windows. This includes creating a user account and other setup steps.
By following these steps, you can successfully install Windows 10 on your Mac using Boot Camp and enjoy the best of both worlds with macOS and Windows on your Mac!
But what if you want to switch from Windows 10 to macOS?
Of course, you should be aware of that too. It’s imperative! Worry not, we are going to discuss the same in the upcoming section.
Steps to Switch Between macOS and Windows
Once everything is done, you can switch between macOS and Windows whenever you start your Mac.
To do this, hold down the Option (Alt) key on your keyboard when your Mac is starting up. You’ll see the option to choose either macOS or Windows.
Alternatively, you can follow the steps below:
- Click the carat from the notification area on the right side of the Windows taskbar to show hidden icons.
- Now, click the Boot Camp icon.
- You will see a menu; choose Restart in macOS.
Wrapping it up…
So, these are the steps that you can follow to install Windows 10 on Apple Mac through Boot Camp. Once you’ve successfully installed Microsoft Windows on your Mac, you’ll have the flexibility to select your preferred operating system at startup. Yes, you can choose to use macOS or Windows as and when you want. All you have to do is to follow the steps outlined above when you desire to switch between operating systems.
Thanks for reading!


