A computer keyboard is a necessary input device, but many users have a problem of it stopping and causing significant inconvenience. The more quickly keyboard problems are solved the smoother the job goes, especially in typing intensive jobs. These problems may have the following sources, such as hardware malfunctions, old drivers, or software bugs.
Example problems can be windows 11 keyboard not working, some keys not functioning, and even strangers keyboards. How to fix the issue and avoid repeating keyboard not working on Windows 10/11 is presented in this tutorial. The process is such that a more integrated and practical computer experience is provided.
Here is a Guide On How to Fix the Keyboard Not Working Error in Windows 10/11
Preliminary Checks
1. Check for Physical Damage

Check for Any Visible Damage on the Keyboard
To begin with, check the keyboard for any obvious damage, including cracked keys, chips, or spills. Physical damage might affect the keyboard’s operation, so it’s important to find and fix any problems immediately.
Ensure the keyboard is properly connected (for wired keyboards)
Verify that the connection is secure for wired keyboards. The keyboard may sometimes cease operating due to a loose connection. To make sure the keyboard is connected properly, unplug it and then firmly plug it back in.
2. Restart Your Computer
Small Glitches Can Be Fixed by Restarting
A computer restart might fix minor keyboard software issues. This refreshes the system, perhaps fixing keyboard difficulties.
3. Try Another Port or Device
Test the keyboard with another computer
Connecting the keyboard to another computer might reveal a problem. If the keyboard works on another device, your computer’s settings or software may be the problem.
Use a Different USB Port (for Wired Keyboards)
If you’re using a wired keyboard, try plugging it into a different USB port. Sometimes, the port itself might be the problem. Using another port can help identify if the issue is related to a specific USB connection on your computer.
Also Read: Proven Methods: Fix Windows 11 Touchpad not Working
Software Troubleshooting
1. Update Keyboard Drivers

Steps to Open Device Manager
- Press Win + X to open the Power User menu.
- Select Device Manager from the list.
Instructions for Updating Drivers
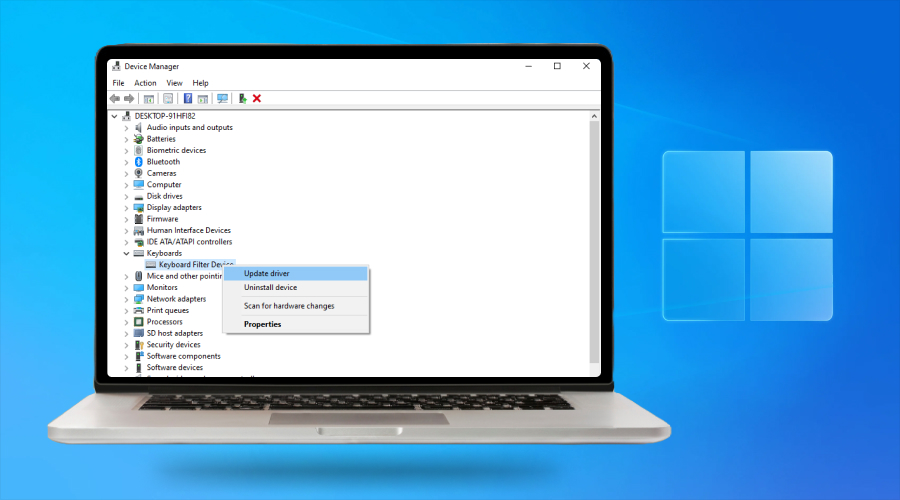
- In Device Manager, locate and expand the Keyboards section.
- Right-click on your keyboard device and select Update driver.
- Choose Search automatically for updated driver software.
- Follow the on-screen instructions to complete the update.
Importance of Keeping Drivers Up-to-Date
It’s essential to keep your keyboard drivers updated if you want to make sure your keyboard works with the newest software and avoid conflicts that might lead to a malfunction. Bug fixes and performance improvements may also be obtained with updated drivers.
2. Reinstall Keyboard Drivers
Detailed Steps to Uninstall and Reinstall Keyboard Drivers
- By using Win + X and choosing Device Manager, you may access Device Manager.
- Expand the ‘Keyboards’ section.
- Select Uninstall device with a right-click on your keyboard device.
- Click Uninstall to confirm the removal.
- Restart your computer after removing the driver.
Rebooting the Computer After Reinstallation
This may fix problems resulting from faulty or missing drivers by automatically reinstalling the default keyboard driver. Verify that the keyboard is working correctly after restarting.
3. Run Windows Troubleshooter
How to Access the Windows Troubleshooter
- Press Win + I to open the Settings app.
- Navigate to Update & Security.
- Select Troubleshoot from the left-hand menu.
Steps to Run the Troubleshooter for Keyboard Issues
- In the Troubleshoot section, find and select Keyboard.
- Click Run the troubleshooter.
- Follow the on-screen instructions to let Windows diagnose and fix any detected keyboard issues.
Running the Windows Troubleshooter can help identify and automatically resolve common problems that might be affecting your keyboard, saving your time and effort in manual troubleshooting.
Also Read: How to Repair and Troubleshoot Windows 11 Bootloader Issues
System Settings Adjustments
1. Check Keyboard Settings
Accessing the Keyboard Settings in Windows
- Press Win + I to open the Settings app.
- Navigate to ‘Devices.’
- Select ‘Typing’ from the left-hand menu.
Ensuring Correct Settings are Applied
Make sure the relevant settings are enabled or deactivated in the Typing settings according to your preferences. For example, make sure that options like “Show text suggestions as I type” and “Autocorrect misspelt words” are configured to meet your requirements. You may improve your typing experience and stop unwanted keyboard behaviour with properly adjusted settings.
2. Disable Filter Keys

How Filter Keys Affect Keyboard Functionality
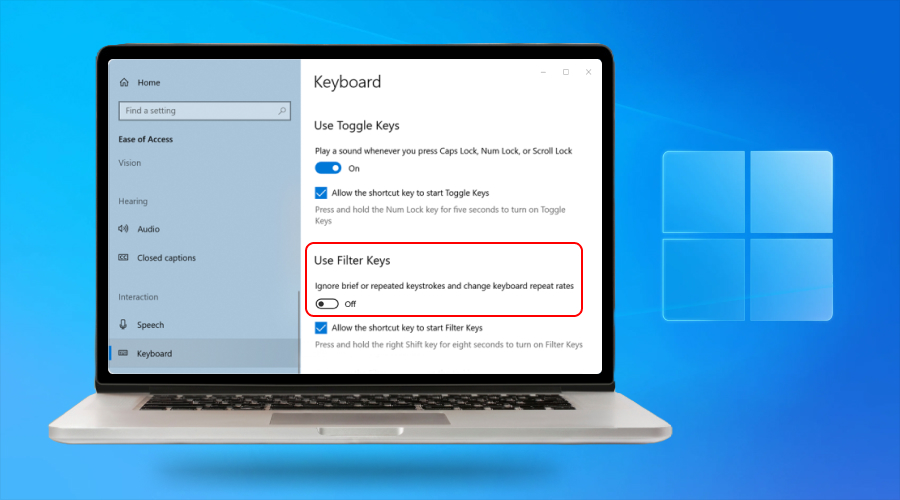
Windows has an accessibility option called Filter Keys that ignores short or repetitive keystrokes. Although this option may be useful for individuals with specific impairments, if it is accidentally activated, it may result in the keyboard responding slowly or not registering inputs.
Steps to Disable Filter Keys
- Open the Settings app by pressing Win + I.
- Navigate to Ease of Access.
- Select Keyboard from the left-hand menu.
- Scroll down to the Filter Keys section.
- Toggle the switch to Off under “Use Filter Keys”.
Disabling Filter Keys ensures that your keyboard responds to all keystrokes promptly, resolving issues caused by the feature inadvertently filtering out your inputs.
Advanced Troubleshooting
1. Check for Windows Updates
Importance of Installing the Latest Windows Updates
It is essential to install the most recent Windows updates to guarantee system compatibility, security, and stability. Updates often offer new features, speed enhancements, and bug fixes that may remedy fundamental problems impacting the operation of your keyboard.
How to Check for and Install Updates
- Press Win + I to open the Settings app.
- Navigate to Update & Security.
- Select Windows Update from the left-hand menu.
- Click on Check for updates.
- If updates are available, click Download and install to begin the update process.
- Follow the on-screen instructions and restart your computer if prompted.
2. Perform a System Restore
What System Restore is and how it works
System Restore is a Windows feature that allows you to revert your computer’s state to a previous point in time. This can be helpful if recent changes, such as software installations or updates, have caused your keyboard to stop working correctly.
Steps to Perform a System Restore to a Previous Point
- Press Win + S and type System Restore.
- Select Create a restore point from the search results.
- In the System Properties window, click on the System Restore button.
- Follow the prompts to choose a restore point before the keyboard issues began.
- Confirm your selection and let Windows complete the restoration process.
- Restart your computer and check if the keyboard issue is resolved.
3. Boot into Safe Mode
How to Access Safe Mode in Windows 10/11
- Press Win + R, type msconfig, and press Enter.
- In the System Configuration window, go to the Boot tab.
- Check the box next to Safe Boot and select Minimal.
- Click Apply and then OK.
- Restart your computer, and it will boot into Safe Mode.
Testing the Keyboard in Safe Mode to Identify Software Conflicts
Windows operates with a minimum collection of drivers and starting apps while in Safe Mode. Check to determine whether your keyboard is operating properly. You can even take a screenshot if you know how to take a screenshot in Windows 11. If the keyboard works well in Safe Mode, a driver conflict or third-party software might be the source of the problem. The conflict may then be found and fixed by methodically disabling or uninstalling recently installed applications or drivers.
Hardware Troubleshooting
1. Test with an External Keyboard
Using an External Keyboard to Determine if the Issue is Hardware-Related
You can diagnose if the problem is with the built-in keyboard or if there is a more widespread hardware issue by testing your computer with an external keyboard. It’s possible that the built-in keyboard is broken if the external keyboard functions flawlessly.
Steps to Connect and Test an External Keyboard
- Plug the external keyboard into an available USB port.
- Wait for Windows to recognize and install the necessary drivers.
- Once installed, test the external keyboard by typing in a text document or using various keyboard shortcuts.
- If the external keyboard works fine, consider inspecting or replacing the built-in keyboard.
2. Check for BIOS/UEFI Settings

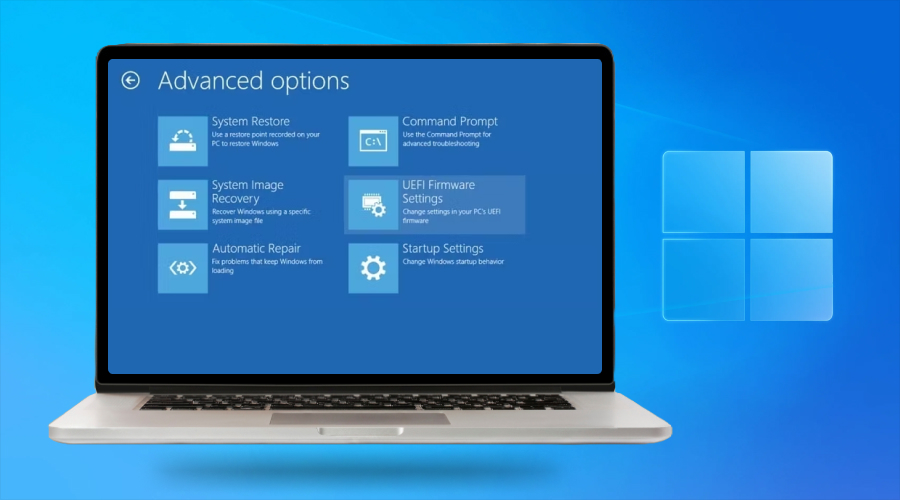
Accessing BIOS/UEFI Settings
- Restart your computer and press the designated key to enter BIOS/UEFI settings. This key is often F2, Del, Esc, or F10 (the exact key depends on your computer’s manufacturer).
- Continue pressing the key until the BIOS/UEFI menu appears.
Ensuring Keyboard Functionality is Enabled in BIOS/UEFI
- Once in the BIOS/UEFI menu, use the arrow keys to navigate to the Advanced or Peripherals tab (the exact name may vary).
- Look for options related to keyboard functionality, such as USB Configuration or Integrated Peripherals.
- Ensure that the keyboard is enabled. If there is an option for Legacy USB Support or USB Keyboard Support, make sure it is turned on.
- Save any changes and exit the BIOS/UEFI menu (usually by pressing F10 and confirming the save).
By checking and adjusting the BIOS/UEFI settings, you can ensure that your keyboard is correctly recognized and functioning at the hardware level, which can help resolve issues that persist even after effectively troubleshooting steps.
When to Seek Professional Help
1. Identifying Hardware Failure
Signs That the Keyboard Might Be Failing
- Unresponsive Keys: Persistent non-responsive keys, even after software troubleshooting.
- Intermittent Functionality: The keyboard works sporadically, indicating potential hardware issues.
- Physical Damage: Visible damage such as broken keys, cracks, or water damage.
- Unusual Behavior: Keys producing incorrect characters or multiple characters with a single press.
When to Consider Replacing the Keyboard
It could be time to replace the keyboard if you see any of the symptoms listed above and software troubleshooting doesn’t fix the problem. This usually entails a more thorough procedure for laptops as opposed to desktops, where external keyboards may be quickly switched out.
2. Consulting a Professional
When to Seek Professional Repair Services
- Persistent Issues: After exhausting all troubleshooting steps, if the keyboard issue persists.
- Complex Repairs: When the problem requires disassembly or soldering, which might be beyond DIY capabilities.
- Warranty Considerations: If your device is still under warranty, seeking professional repair can prevent voiding the warranty.
How to Find a Reputable Repair Service
- Research Online Reviews: Look for repair services with high ratings and positive customer feedback.
- Ask for Recommendations: Seek suggestions from friends, family, or colleagues who have had similar issues.
- Check Certifications: Ensure the service provider has certified technicians, especially for specific brands like Apple or Dell.
- Inquire About Warranty: Ask if the repair service offers a warranty on its work. This will ensure peace of mind for future issues.
Seeking professional help can save time and prevent further damage, especially for complex hardware issues. By choosing a reputable service, you can ensure your keyboard is repaired or replaced efficiently and correctly.
Conclusion
Fixing keyboard problems in Windows 10/11 can be done by looking at a simple series of steps. As simple as the adjusting of settings and programs, the testing of external keyboards, and the seeking of professional help. Doing so will turn off the lost keyboard functionality and bring it back.
Regular maintenance, including installing updates and ensuring proper connections, can prevent future issues. Following this comprehensive guide can efficiently address keyboard problems and enhance your computing experience. Should the problem persist, seeking professional help ensures that your device is in capable hands for a thorough resolution.


